Letter Carving Step-by-Step
The art of carving incised lettering is both a valuable skill for a professional woodworker and an instructive practice for beginners.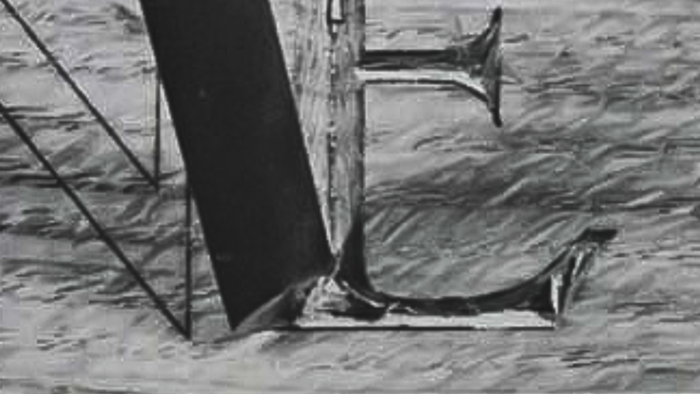
[Content from FWW #14, p. 66]
See the PDF for higher-quality photos.
Carving incised lettering is a valuable skill in the repertoire of a professional woodworker and also an instructive practice for the beginner. Its decorative effect has many applications, and its visual appeal is universal. Incised letters are the opposite of relief and are cut directly into the wood without using a router; it’s actually a form of chip carving.
Those wishing to take up the work need only a small collection of chisels, a mallet, a pencil, and a good piece of wood. The tools used on the sign shown here were a 1/2-in. and 1-in. #1 firmer chisel; a 3/4-in. #3; a 3/4-in. #4; a 3/4-in. #5 and a 1/2-in. #5 fishtail; a 1/2-in. #6; a 3/8-in. #10; and a V-tool. Starting out, you’ll need a V-tool and several sizes of flats (firmers). From there, you will want two sizes each of #3. 4, 5, and 6., say 3/8 in. or 3/4 in., and one each of #7, 8, 9, and 10, in various widths. The quicker gouges are not much called for in incised lettering, yet the occasion will come along when they are just what is needed.
It is difficult to propose a truly all purpose set. I favor buying tools individually right from the start. Quality rather than quantity is essential; nothing is worse than the poor steel and awful handles that come in cheap sets. Learning to carve with a few tools stretches the carver’s imagination and ability. A great collection of chisels is usually built up gradually.
Letter design can vary widely, but almost always has to be drawn out for each job. Therefore, good models should be studied. As reference books, I particularly recommend Writing and Illuminating and Lettering by Edward Johnson, Italic Calligraphy and Handwriting by Lloyd Reynolds, and History and Technique of Lettering by Alexander Nesbitt. These authors are well-known designers and teachers; their information is helpful for relief carving as well as incised carving projects. Frequently, popular graphics can be imitated, and draftsman’s transfer letters are often good.
Sharp, accurate work all the way through will ensure success in incised carving, even on the first try. Speed and boldness are actually an advantage—one sure hit produces a better surface than lots of puttering. The letters in the sign shown took me about ten minutes each to carve.

1. For this sign, I used roman capitals and italics. It looks both formal and informal, the proper accent. I started with the board sized up, and sketched in with a broad pencil. This was traced for a better outline, and then in several copies on the drafting board, worked up into a well proportioned drawing. This was a process of constant, gradual correction. In these tracings, as well as the laying out on the wood, sharp, accurate lines are essential.The wood to be carved should be as straight-grained as possible, so as to be predictable. Radial grain is excellent (this is quartersawn red oak) and can be relied upon not to warp outdoors. The board should be fully planed and scraped before carving; it should not be sanded, however, because the abrasive left in the pores of the wood will.dull the tools.

2. The side surfaces of incised letters slant down at a uniform angle to meet in the middle of the letter width. A center line drawn on the wood may give the idea.

3. A sharp chisel is held on the line, on an angle, and hit with the mallet. Cut alternate sides, at a constant angle, until they meet cleanly at the center. One or two taps with the mallet will be sufficient. The cut chips should fall out; prying with the chisel destroys the top edge of the letter.

4. At the corners, the chisel must be held out to avoid damaging the intersecting wall. All sides slant in. Misjudging this is a common difficulty.

5. It is important to master the stop cut. The breakout from the wedging chisel must be anticipated by a cut on the other side to avoid losing something you want. The center arrow shows where the tip of the wood inside the letter has broken off. This time it was moved by the back of the chisel, because it was weaker than the ground I was lifting. The other arrows show other danger points. Glue is indeed the woodcarver’s best friend.

6. The serifs are dramatic, being curved, and relatively easy to carve. Here, a medium #5 tool is used upside-down, one corner on the center of the existing V and the other near the desired point of the letter. A similar cut is made on the other side using a #6, as dictated by the design. A cut across the end with a small flat, and most of the work is done.

7. An E is carved in the same way. The slant of the letter sides remains constant throughout the alphabet. I invariably establish this angle by eye alone, but here measured it for the reader’s reference: 38° off horizontal. Using the largest chisel practical promotes straight surfaces.

8. I find carving parallel to the grain much harder than across. The chisel quickly runs into the wood, so it is especially important to watch grain direction and pressure.

9. Taking the letter down all around reveals that the narrow areas are not as deep as the wide areas. Therefore the horizontals of this E intersect only the upper side wall of the vertical. The centerlines of the two parts do not meet. This makes for some conceptual difficulty, but is quickly learned.

10. Carving the bottom serif requires the #5. as before. I carve the serif curve against the grain of the letter out. This is easier to control and generally leaves an excellent surface. I carve the other way as well in difficult grain, but it’s harder to see where I’m going.

11. The big flat cuts out the end wall. Take care to be out of the wood on the left while on the same angle as the existing bottom of the letter. The rest of the cleanup is done by hand. Cutting with the mallet has worked the letter almost to the bottom, so that only a few bits and shavings remain. These can be cut out without the mallet, with a smooth push on the chisel or an occasional tap with the open palm. Generally, the hand holding the chisel grasps low on the steel, in an overhand position, leaving the handle exposed. There is more control this way, because the guide is closer to the cutting edge. This holds true while malleting as well. The wrist and perhaps the forearm of the hand holding the tool should rest firmly on the wood.
Another technique that is useful in cleaning up, especially on long, straight sections, is tipping the chisel up onto one corner and pulling it toward you like a knife. In any event, take care to keep the back of the chisel lying tightly on the side of the letter already carved.

12. Curved letters are carved in the same way, using curved tools. Holding the chisel upside-down on the inside takes some getting used to, and on the outside, your chisel angle has to take into account the sharpening bevel.

13. It is helpful to carve pushing with the grain, as indicated by the arrows, particularly when cleaning up the inevitable gouge ridges. The letter sides should be flat or slightly concave.

14. The sides commonly become a series of chisel cuts, or rounded over, rather than a flat plane. This problem is avoided by keeping the back of the chisel tightly against the work and overlapping the cuts. This way, the chisel is self-jigging.

15. It takes four cuts to shape and clean the serif area. The delicate point can be accentuated, because there will be a little loss in sanding. The letters themselves should never be sanded, because sandpaper would destroy the crispness and fill the grain. Surface sanding of the finished sign sharpens up the letter outlines considerably. Sometimes, a cabinet scraper can be used as well. I do not recommend planing, however, because I think it takes off too much of the wood and the letters.

16. Difficult areas like the centers of these two letters are merely complex intersections of flat planes. Much imagination is required, but if the constant angle is maintained, everything gradually falls into place.

17. On small letters in softwoods, the V-tool can be used exclusively. In this job, I used it just for hairlines, as in this Z. I don’t favor its use in cleaning up big letters because it leaves a slightly rounded bottom that detracts from the crisp look. In any event, it should be kept very sharp, because one side of the tool is always cutting against the grain.

18. The chisels for the italics are selected carefully to closely match the tracing lines. The sides are worked down in the conventional way until they meet in the middle.

19. I find this #5 fishtail very handy on little letters. A brass brush with fine wires is also helpful in removing the last shavings that hang in the carving.
Fine Woodworking Recommended Products
Veritas Wheel Marking Gauge

Marking knife: Hock Double-Bevel Violin Knife, 3/4 in.
Olfa Knife


Log in or create an account to post a comment.
Sign up Log in